cPanel: Security Heading
Security Section
The Security section in cPanel includes the following tools – Password Protect Directories, IP Deny Manager, HotLink Protection, Leech Protect, Site Security Check.
cPanel security tools allow the customers to protect different parts of their web sites from unauthorized access.
Password Protect Directories
You can limit the access to certain resources of your website by password protecting the directories in which they are stored.

How to Password Protect Directories Detailed Tutorial
Select the Password Protect Directories icon from your cPanel main page. A list of the directories on your account will appear.
Select the directory you wish to limit access to. In the new page, please create a username and a password for your user. Select a name that will appear in the login screen and click on the Save button to activate the protection.

Please note that you have to create a directory before you enable the password protection for it. Also, using one and the same directory for the purpose of password protection and FTP storage at the same time is not recommended.
It is also important to add that password-protecting your webroot (the www directory) will lead to inability of your website to be displayed directly.
IP Deny Manager
Allows you to prevent an IP address, a domain name or a range of IP addresses from accessing your web site.
How to use IP Deny Manager
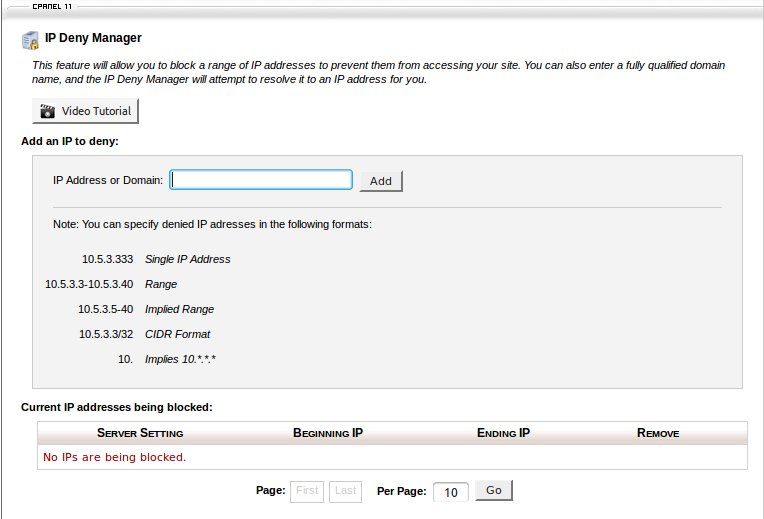
The IP Deny Manager allows you to prevent an IP address, domain name, or block of IP addresses from accessing your web site. If someone is using a lot of your bandwidth, posting malicious content, or should not be allowed to access your site for another reason, you can prevent them from doing so in the IP Deny Manager.
Deny access to a domain or IP
Step 1 To access the IP Deny Manager, click on the corresponding icon in the Security section of your cPanel interface.
Step 2 Enter the IP address or domain name you wish to deny access from in the blank field next to IP Address or Domain: (You can enter an IP block such as 1.2.3. to deny access to all IPs that start with 1.2.3.).
Step 3 Click on Add.
How to IP Deny Access
Step 1 To access the IP Deny Manager, click on the corresponding icon in the Security section of your cPanel interface.
Step 2 Click on the Remove icon next to the blocked IP or IP range, for which you want to allow access.
Make sure you have entered the IP address or domain in the proper format when adding IPs or domains to deny. IPs should be in the following format 1.2.3.4, and domains should look like domain.com.
Allow access to a denied IP address
If you no longer wish to deny access from a specific IP address, you can use the IP Deny Manager to allow access from that IP address.
Step 1 To access the IP Deny Manager, click on the corresponding icon in the Security section of your cPanel interface.
Step 2 Click on the Remove icon next to the blocked IP or IP range, for which you want to allow access.
SSL Certificates
What is SSL? SSL is an acronym for Secure Sockets Layer, an encryption technology. SSL creates an encrypted connection between your web server, and your visitors’ web browser allowing for private information to be transmitted without the problems of eavesdropping, data tampering, or message forgery.
To enable SSL on a website, you will need to get an SSL Certificate that identifies you, and install it on the server for which you website and mail reside. The use of an SSL certificate on a website is usually indicated by a padlock icon in web browsers, but it can also be indicated by a green address bar. Once you have done the SSL install, you can access a site securely by changing the URL from http:// to https://. When an SSL certificate is installed on a website, you can be sure that the information you enter (contact or credit card information), is secured and only seen by the organization that owns the website.
Prices for SSL Certificates can vary so it is best to check with the providers details on this.
SSL certificates are typically purchased for a 1-year term and are non-refundable. Your SSL provider may allow you to purchase a certificate for more than 1 year. This reduces the number of times you must reinstall the SSL.
Types of SSL
There are several types of SSL certificates. The most commonly used types of SSL certificates on servers are shared and private SSLs.
Shared SSLs – Shared SSL certificates use the hosting provider’s domain and will cause a certificate warning message to pop up on your site if you attempt to use your domain name in the URL instead of the hosting provider’s domain.
Private SSLs – Private SSL (256 bit) uses your domain name and will not cause any warning messages. Private SSL is preferred for protecting credit card information.
Installation Requirements
Before an SSL certificate can be installed, the domain must have a dedicated IP address. All hosting plans come equipped with a shared SSL which uses a shared IP address. Since cPanel is limited to working for only one IP address at a time, you may not have more than one SSL per cPanel. This means that if you use addon domains, only the addon domain or the primary domain may have the SSL certificate.
Managing an SSL Certificate
If you wish to make changes to your SSL certificate before it expires, such as updating the domain name or WHOIS information or switching the SSL certificate to a new server/host, then you must request to have the certificate reissued. After the SSL has been reissued, re-installation is required.
Renewing an SSL Certificate
When it is time to renew an SSL certificate, you must purchase and install a new certificate; this applies to reissued certificates as well. When you renew your SSL certificate, you will need a new CSR. When the SSL certificate is issued, you will receive three different groups of alphanumeric data sent from the certificate provider:
The SSL certificate
The RSA key
A CA bundle (possibly)
Most web hosting providers will install and renew the SSL certificates for the clients. Pleas enote this could cause for additional charges with some.
SSL/TLS Protection
The SSL/TLS Manager will allow you to generate SSL certificates, certificate signing requests, and private keys. These are all parts of using SSL to secure your website. SSL allows you to secure pages on your site so that information such as logins, credit card numbers, etc are sent encrypted instead of plain text. It is important to secure your site’s login areas, shopping areas, and other pages where sensitive information could be sent over the web.
SSH/Shell Access
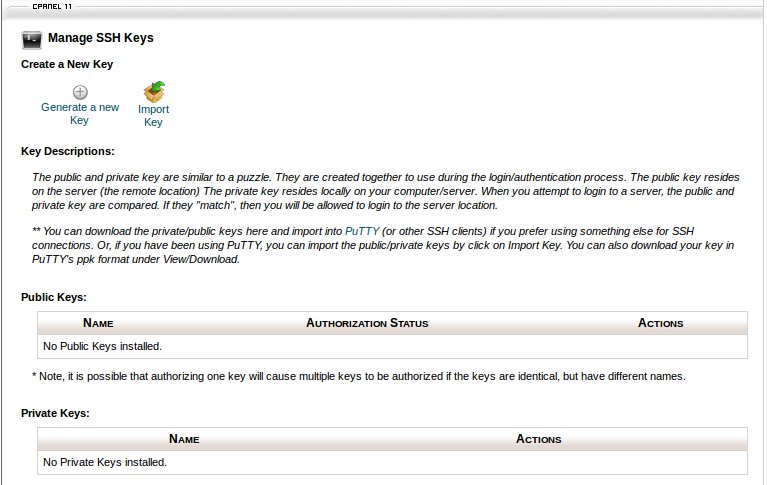
SSH allows secure file transfer and remote logins over the internet. Your connection via SSH is encrypted allowing the secure connection. In this section you can manage your SSH keys to allow automation when logging in via SSH. Using public key authentication is an alternative to password authentication. Since the private key must be held to authenticate, it is virtually impossible to brute force. You can Import existing keys, generate new keys, as well as manage/delete keys.
The public and private key are similar to a puzzle. They are created together to use during the login/authentication process. The public key resides on the server (the remote location) The private key resides locally on your computer/server. When you attempt to login to a server, the public and private key are compared. If they “match”, then you will be allowed to login to the server location.
HotLink Protection
The HotLink Protection tool allows you to prevent other websites from directly linking to files on your website. This means that when another website is visited, it cannot load pictures from your pages – this is one of the ways for limiting the outbound traffic for your account.
An example of hotlinking would be a different website using HTML code to display an image from your site. In effect, the other website is using up your bandwidth quota.
Hotlink Protection Detailed Tutorial
To use the tool, click on the HotLink Protection icon on cPanel’s main page and follow the instructions. Include the websites you wish to have access to your files – those may be affiliates or friends linking to your banners, etc.
In order to block certain file types from being accessed, enter their extensions in the space provided – this way you can allow other websites to reach for your images, but disallow video or audio files from being accessed.
cPanel attempts to add all the domain names that you own with SiteGround to the allowed list. Still, if you have accounts on other servers you may need to have some of those added manually.
Make sure that you include all sites that need to access your protected files in the first field or they will not be able to view the files. If you still cannot view a file, try disabling Hotlink Protection to see if it is the cause of the problem.
Leech Protect
Leech Protect allows you to prevent your users from giving out or publicly posting their password to a restricted area of your site. This feature will redirect (and suspend if selected) accounts which have been compromised to a url of your choice.
GnuPG Keys
GnuPG is a publicly available encryption scheme that uses the “public key” approach. With GnuPG, messages are encrypted using a “public key” however, they can only be decrypted by a “private key”, which is retained by the intended recipient of the message