cPanel: Files Heading
Under the Files heading, you will see something like this:
Files Section
In this section the client can manage the files that exist within the web hosting account such as backups, file management tools, permissions access, quota statistics, web disk management, ftp management, etc.
Backups
Backups allow you to download (to your computer) a zipped copy of either your entire site (including your home directory, databases, email forwarders configuration, and email filters configuration) or one of the previously mentioned parts of your site. These are not automatically scheduled backups. Automatically scheduled backups need to be enabled by the server owner/administrator.
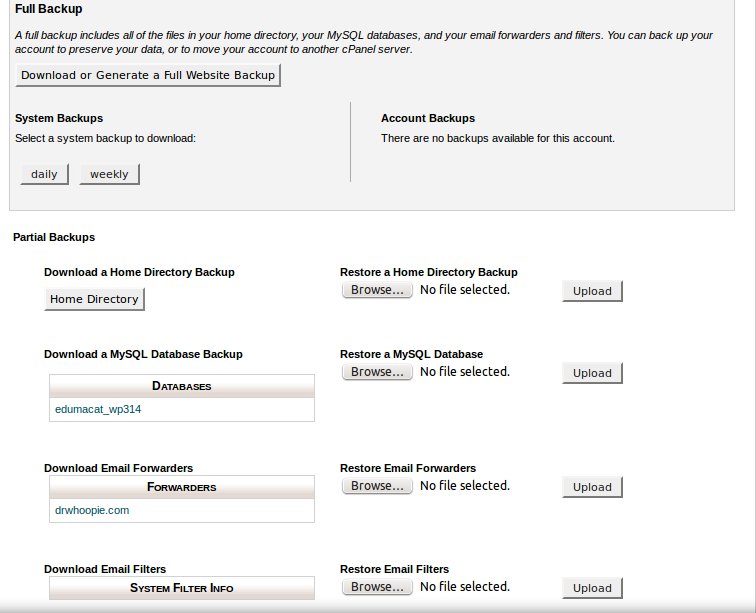
*Note that web hosting providers vary in how they run their scheduled backups, so it is best to check the providers wiki page for accurate information on those. As stated those time frames vary but normally run daily weekly and monthly. It is good to know this for cases where a client needs a backup for three days prior to contacting support, if we only run daily the backup would reflect yesterdays details and not three days ago.
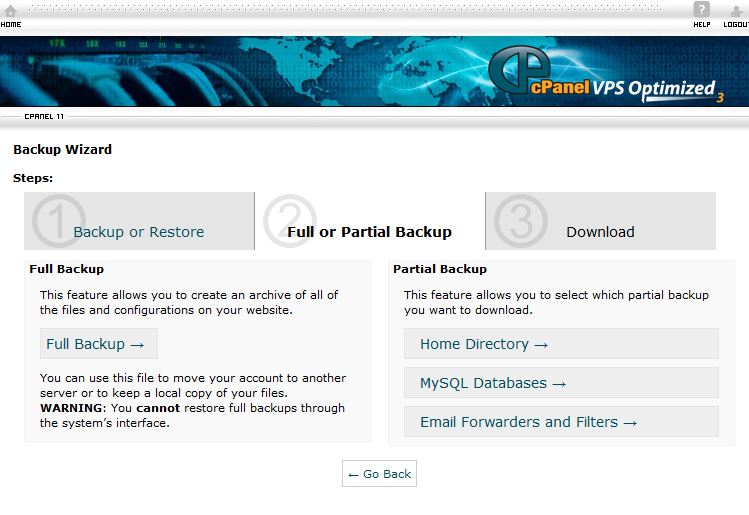
Backup Wizard
This feature allows you to download a zipped copy of your entire site or parts of it onto your computer. The following are backed up and included in a zip file for your convenience: Home Directory, MySQL Databases, Email forwarders configuration, and Email filters configuration. You also have the ability to restore parts of your cPanel by uploading your partial backup zip file(s) that you downloaded from the backup feature mentioned here. You can also email yourself a copy to your contact email address for the billing and administrative portion (Client Area) of your webhosting account.
Website Files
Before we go into the file manager portion of the Cpanel tool coverage we would like to go over the structure of the files for your website and hosting account. It is good to have your file manager open so you can see those directories as we discuss them.
Your website is made up of a group of files and directories, much like the Documents folder on your home computer. In this case, though, everyone in the world can see some of your files.
Here is an example of the files and directories in your site. There are three main directories to be concerned with:
/home/yoursite/ – this is your home directory. All of your files are stored within this directory. Files placed directly in this directory will not be visible on the Internet. You will start out in your home directory when connecting by FTP, Web Disk, or the File Manager which we will be discussing further soon.
/home/yoursite/public_ftp/ – this is the directory used for anonymous FTP access. Any files in this directory can be downloaded by anyone if anonymous FTP access is enabled.
/home/yoursite/public_html/ (www) – The public_html directory contains the files for your site. Files in public_html and any subdirectories of public_html will be viewable by anyone on the internet. /home/yoursite/www/ is the same directory as /home/yoursite/public_html/.
When someone views a directory in your public_html area, they will see the index page for that directory. When creating your index page, you should use one of the following names – the first one found will be shown if the visitor doesn’t specify a page in the URL:
index.htm index.cgi Default.html
index.html index.php
index.xhtml default.htm
index.perl default.html
index.pl home.htm
*Note – when adding files to your site, it is important that you add them in the right place. For example, you will need to place files you wish to be visible on the Internet within public_html or a subdirectory of public_html. If you place them in / for example, no one will be able to view them.
Other files you will find in the filemanager directory and root access of your account will include temp files, mail files, spam filtering files, access logs, site bulders, and ssl files.
Permissions
Aside from the areas you upload your files to, clients and web hosting providers also have the ability to set permissions on there files. Permissions come in three types:
- Rs – Read permission: Enables you to look at a file or directory. You can use cat or a text editor to see what’s in a file that has read permission. You also can copy this type of file. Read permission for a directory enables you to list the directory’s contents.
- Ws – Write permission: Enables you to make changes to a file. Even if you can write (change) a file, you can’t necessarily delete it or rename it; for those actions, you must be able to write in the directory in which the file resides. If you have write permission in a directory, you can create new files in the directory and delete files from it.
- Xs – Execute permission: Enables you to run the program contained in the file. The program can be a real program or a shell script. If the file doesn’t contain a program, execute permission doesn’t do you much good and can provoke the shell to complain bitterly as it tries (from its rather dim point of view) to make sense of your file. For a directory, execute permission enables you to open files in the directory and use cd to get to the directory to make it your working directory.
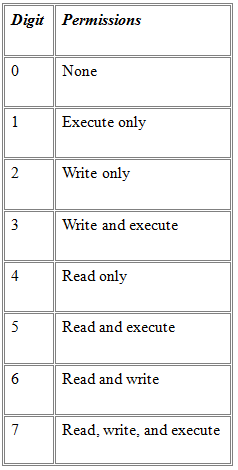
It’s not too difficult to figure out which permissions a file has by looking at the collection of rs, ws, and xs in the file listing. Sometimes permissions are written another way, however: with numbers. When permissions are expressed as a number, it’s a 3-digit number. The first digit is the owner’s permissions, the second digit is the group’s permissions, and the third digit is everyone else’s permissions. Every digit is a number from 0 to 7. The table below lists what the digits mean.
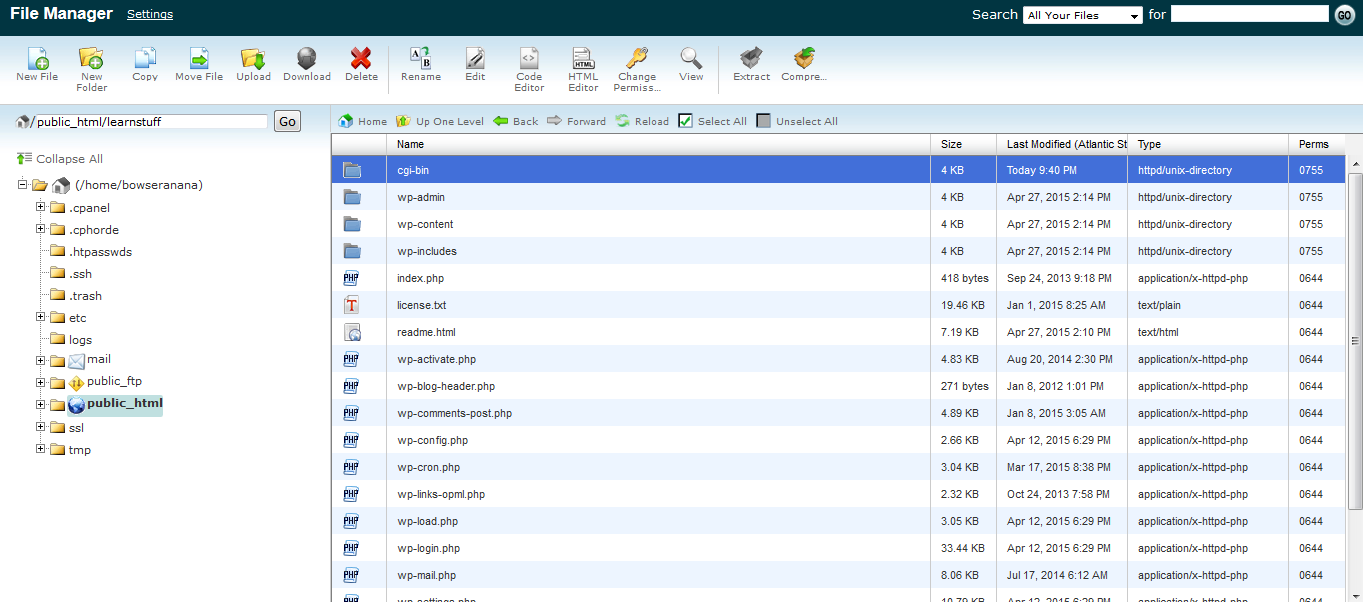
File Manager
The File Manager allows you to manage your site through HTTP rather than an FTP tool or other third-party application. You can upload, create or delete files, organize files in folders and change file permissions. While not as sophisticated as most FTP tools, File Manager gives you all the basic functionality necessary to manage your site.
To access the File Manager click on the corresponding icon in the Files section of your cPanel
Creating a new folder
Folders are a very useful way of adding an organization and a structure to your account. They make the maintenance of the site much easier. You can easily list the files in every folder. Most web sites include at least an /image folder to keep all the image files separately.
Step 1 Click on the New Folder link.
Step 2 Enter the name of the new folder and define the location where it will be created.
Step 3 Click on the Create New Folder button. The new folder will appear in the chosen location.
Uploading New Files
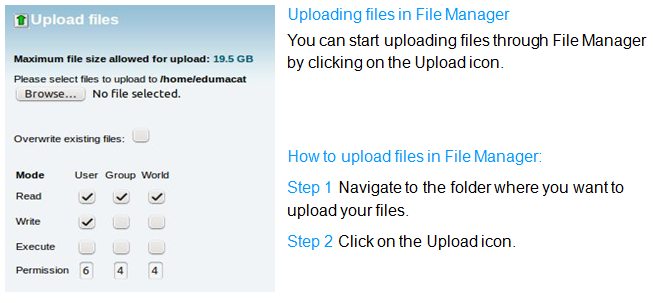
Step 3 Click on the Browse button next to one of the top fields.
Step 4 Search for and double-click on the first file to upload. The upload will start automatically.
Step 5 Repeat the above steps for each file you want to upload.
Step 6 Click on the Overwrite existing files check box if you want to overwrite existing files with the same name.
You can download files from the server to your personal computer through the Download option.
You can copy and move files between the account’s folders through the Copy and Move File functionalities. You can Rename and Delete the existing files through the corresponding options.
Creating a new file
For small files it can be easier to create them online rather than on your home computer.
To create a new file please follow the steps listed below:
Step 1 Click on the New File link.
Step 2 Enter the name of the file to be created. Please mind to add the correct extension. For example if you create a Perl file, the extension will be .pl.
Step 3 Pick the destination where the file should be saved and click on the Create New File button. The file is created.
Editing a file
Editing an existing file through the File Manager allows you to make immediate changes to your web site without having to upload a new version of the file. This is useful for small changes but would be inefficient for large alterations. To edit a file please follow the steps below:
Step 1 Navigate to the folder where the file is located.
Step 2 Click on the name of the file.
Step 3 Click on the Edit link in the top menu of your window. This will open a new window with the content of the file displayed.
Step 4 Alter the text of the file.
Step 5 Click on the Save Changes button when you are ready. The file is saved and the changes will take effect from now on.
You can use more sophisticated editors as the Code Editor and the HTML Editor. You can also click on the View link in the File Manager main menu. The file will be opened for reading and you will not be able to edit it.
Extracting/Compressing a File
You can extract archive files using the Extract function.
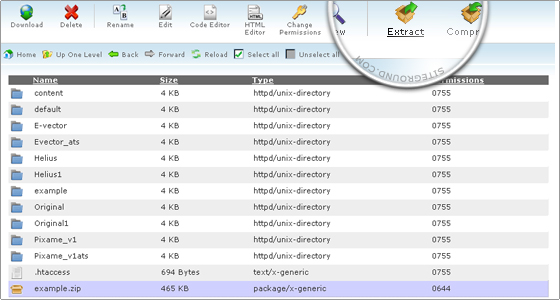
You can also create your own archives. Select the files and folders which you want to include in the archive, click Compress and then Compress File(s).
Legacy File Manager
This area is your access to any legacy files saved from your previous platform, or web hosting sever. You do not have as many abilities in the legacy file manager, but you still are able to create folders, and files, upload through here etc.
Disk Space Usage
The cPanel Disk Usage Viewer provides an overview of the disk space that your account is using. It shows disk usage totals for your account’s directories and all of its databases rather than for individual files, or databases. Use the File Manager to see disk usage data for individual files, and the MySQL main pages to see data for individual databases.
To view the disk space usage totals for your account’s directories and databases:
Step 1 : Login to cPanel.
Step 2 : In the Files section, click Disk Space Usage.
This page shows you how disk space usage is distributed within your account’s home directory. It can be useful when you need to know what is causing you to reach a disk space quota limit.
WebDisk
The Web Disk application allows you to manage and manipulate files on your server in multiple types of interfaces, such as your PC, mobile device, or certain types of software. You can choose a more familiar interface that will make file management tasks easier to complete.
By default, the main Web Disk account created with the user’s home directory set as the Web Disk location. This account uses the same login information as your cPanel account and has access to all of the files in your home directory.
You can create additional users to use with the home directory, or any subdirectory under the home directory, as theWeb Disk location.
To create a Web Disk account, perform the following steps:
Step 1 : Enter the desired username in the Username text box.
If you have more than one domain, select a domain or subdomain from the menu.
Step 2: Enter and confirm the new password in the appropriate text boxes, or simply generate one.
Step 3: Enter the directory that you wish Web Disk to connect to on startup in the Directory text box.
Step 4: Select the Permissions level for this account.
- Read-Write — This access level permits all supported operations inside the assigned directory.
- Read-Only — This access level only permits this account to read, download, and list files inside the assigned directory.
Step 5: Click Create
Manage Additional Web Disk Accounts
The Manage Additional Web Disk Accounts table displays all additional user accounts that you create for Web Disk. If you have a large number of Web Disk accounts, you can use the “Search” box above the table to find specific accounts.
Login – The login for the account, in username@domainname.com format.
Directory – The assigned directory for the account (which is clikcable for quick access to the filemanager area of this).
*Here you can click the change directory icon to do just that. As well as change the pasword protection for the directory.
Access WebDisk – This is a quick access for entering Web Disk.
Actions – Here you can enable digest authentication, change password, delete the account, and adjust permissions.
Password protect a Web Disk Directory
Note: Password protection does not control Web Disk access to a directory. This feature allows you to ensure that the files you upload remain password protected if they are uploaded to a publicly accessible directory that is linked to your account. If you choose to password-protect Web Disk directory, you must create a user to access that directory.
To password protect a Web Disk directory, perform the following steps:
Step 1: Click for the Web Disk account that you wish to protect. A new window will appear. Note: This feature affects the Web Disk account’s assigned directory.
Step 2: Select the Password protect this directory box.
- Enter a name for the protected directory in the Name the protected directory text box.
- Click Save.
Create a user to access a protected Web Disk directory
To create a user who can access the protected directory:
- From the Manage Additional Web Disk Accounts table, click for the Web Disk account, and directory that you wish for the new user to access. A new window will open.
- Enter the desired username in the Username text box.
- Enter and confirm the new password in the appropriate text boxes.
- Click Add/modify authorized user.
Remove an authorized user from a protected directory
To delete a user:
- From the Manage Additional Web Disk Accounts table, click for the Web Disk account and directory that you wish the new user to access. A new window will open.
- Select the username you wish to delete from the text text box under the Authorized Users
- Click Delete User.
*Note – This feature does not delete theWeb Disk account, only the user account for the password protected directory.
Access a Web Disk account
To log in to a Web Disk account:
- Click the Access Web Disk button that corresponds to the account that you wish to access.
- Select your operating system’s version from the appropriate menu.
- Select the SSL checkbox if you wish to connect with SSL.
- Follow the Manual Connection Instructions or the Quick Start Script Instructions to connect to your Web Disk.
- The Quick Start Script will download and run a script on your PC to connect to your Web Disk.
- If you use Nautilus or Konqueror on a Linux system, you do not need to download a script. Follow the instructions that appear on the page.
Enable or disable digest authentication
To enable digest authentication:
- Click Enable Digest Authentication.
- Confirm your password in the Enable Digest Authentication dialog box.
- Click OK.
To disable digest authentication:
- Click Disable Digest Authentication.
- A Disable Digest Authentication confirmation dialog box will appear.
- Click OK.
*Note – This is not required should the domain havean SSL Cert.
Change the Web Disk password
To change a Web Disk password:
- Click the Change Password link that corresponds to the account for which you wish to change the password.
- Enter and confirm the new password in the appropriate text boxes.
- If desired, check Enable Digest Authentication.
- Click Change.
Delete a Web Disk account
To delete a Web Disk account, perform the following steps:
- Click the Delete link that corresponds to the account that you wish to delete. A new page will appear.
- Click Yes.
- If you wish to keep the account, click Cancel.
Set Web Disk Account Permissions
To change a Web Disk account’s permissions, perform the following steps:
- Select the Permissions level for the account.
- Read-Write – This access level permits all supported operations inside the assigned directory.
- Read-Only – This access level only permits this account to read, download, and list files inside the assigned directory.
- A Setting Read-Only Access or Setting Read-Write Access confirmation dialog box will appear.
- Click OK.
FTP Accounts
Before we discuss managing FTP accounts through the File Section here lets go over what FTP is, and how it works.
FTP
What is FTP?
FTP is short for File Transfer Protocol. A protocol is a set of rules that networked computers use to talk to one another. And FTP is the language that computers on a TCP/IP network (such as the internet) use to transfer files to and from each other.
You’ve probably encountered FTP out there on the net already. Ever download a movie, song, or picture? Then you have probably used FTP without even knowing it. Today’s web browsers allow you to download files via FTP from within the browser window. It’s very convenient, and it’s great for those times you need to download a file or two, but the browser-download method does not offer much in the realm of flexibility. You can’t upload, force a particular transfer mode, or ask the server any questions. And don’t even get me started on the security issue. But if you are doing any sort of web development, you need all this functionality. The best way to pursue file transfers is with a bona fide FTP client. You use an FTP client to log into an FTP server, navigate the server’s folder structure, and exchange files. That’s pretty much all FTP clients do. As far as stand-alone FTP clients go, there are literally hundreds out there. Some are free, some are more expensive than a night on the town. We’ll take an in-depth look at the joy of using an FTP client in the pages that follow, but first, let’s look at exactly how an FTP session works.
Logging In
Connecting to an FTP server is very similar to connecting to just about any other server on the Web. Like others you are required to enter the server name, username and password before you can exchange information with the server. In some cases a port also needs ot be specified. (These details are included in the web hosting clients welcome letter they receive upon signup).
*Note – Those login details normally mimic the clients control panel’s logins.
FTP Port
A port is best envisioned as a little door on the server. Most servers on the web have a multitude of such doors, each with its own purpose. Each port number is dedicated to a corresponding application on the server, and the traffic intended for an application (such as an FTP server or web server) passes through the application’s dedicated door. Each port handles a specific type of transaction between the server and client. By default the FTP protocol is handled by ports 20 and 21.
FTPing with the Browser
As we have seen, the best way to run FTP is through a real FTP client. However sometimes it’s just plain easier to grab files off an FTP server using a web browser. As you’ll notice, when a browser is pointed to an FTP server instead of a web server, the http:// in the address field changes to ftp:// since you’re working with a different protocol, after all. Your browser’s address field will look something like this:
ftp://username:password@ftp.bowseranana.com/
When using a browser to connect to an FTP server, you may be asked to log in just like you would if you were connecting with an FTP client. Once inside the server, your user name and the password you give will be reflected in the server path, as shown above. If you logged in anonymously, your username would show up as the word “anonymous” and your email address would serve as the password. Most browsers are set to log into FTP servers anonymously by default.
A web browser can navigate an FTP server much like any other file system. You can click on folder’s name to browse that particular folder and click on files to download them. But even though browser FTPing is nice an convenient, as a general rule use an FTP client whenever possible. Browsers offer minimal functionality and, not surprisingly, minimal security in FTP mode.
FTP Accounts
FTP accounts allow you to access your website’s files through a protocol called FTP. You will need a third-party FTP program to access your files. You can log into via FTP by entering the domain name on the account (eg: serversitters.com) as your FTP host and the username and password of the account you wish to log into.
FTP Session Control
You can use this function to see who is currently logged into your site through FTP. You can also terminate any FTP connections to your site that you feel should not be open. This can be very useful in preventing users from accessing your files without your permission.
Annonymous FTP
Many public servers on the Internet allow users to log in and download files via FTP by connecting anonymously. This is a very common practice in the world of open-source and freely distributed software.
When you connect anonymously to an FTP server, you’re not really anonymous in the truest sense. Most of the time, you are required to enter “anonymous” as your user name and your email address as your password. This is a gesture of courtesy toward the server administrators so that they can get some idea of who’s logging in and downloading their files. Even if you are connecting anonymously and you aren’t required to give any personal information during the connection process, any sysadmin worth her salt is logging your session. This means that if you do anything nasty or illegal, the server administrator has your number (quite literally, your host domain and IP address). You can be put on probation, blocked, or prosecuted. So, here’s a tip to remember:anonymous is never really anonymous as far as anonymous FTP is concerned.
.HTACCESS
The .htaccess file is a special Apache file that adjusts the way your website behaves. You can edit the existing .htaccess file on your site, or you can create a new text file in any directory and name it .htaccess.
How to Edit Your .htaccess File
The .htaccess file contains directives (instructions) that tell the server how to behave in certain scenarios and directly affect how a website functions.
Redirects and rewriting URLs are two very common directives found in a .htaccess file, and many scripts such as WordPress, Drupal, Joomla and Magento add directives to the .htaccess so those scripts can function.
It is possible that you may need to edit the .htaccess file at some point, for various reasons.